
Short, practical explainers for avionics features and cockpit tools pilots may not use every day.
You enter a flight plan on the GTN 650, glance at your G3X moving map, and — nothing. Or you modify a waypoint on the G3X and wonder why the GTN is still flying the old route. Or you push a flight plan from your EFB on your iPad and aren’t sure which box actually received it.
If any of that sounds familiar, you’re not alone. The G3X and GTN are two of the most capable pieces of avionics Garmin makes, and together they form an incredibly powerful IFR cockpit. But the way they share flight plan data isn’t obvious, the documentation is scattered, and the gotchas are real.
This post lays out exactly how the sync works — the architecture, the normal workflows, and the things that will trip you up if you don’t know about them. It doesn’t cover every possible way to move data around this panel; there are more permutations than are useful to explore. What it covers are the workflows that represent best practice — the ones that are reliable, repeatable, and safe to build habits around.
The Architecture: What Connects to What
Before diving into scenarios, it helps to have a clear mental model of how the three layers — your iPad, your G3X, and your GTN — are connected and what each one does.
The Three-Layer Stack
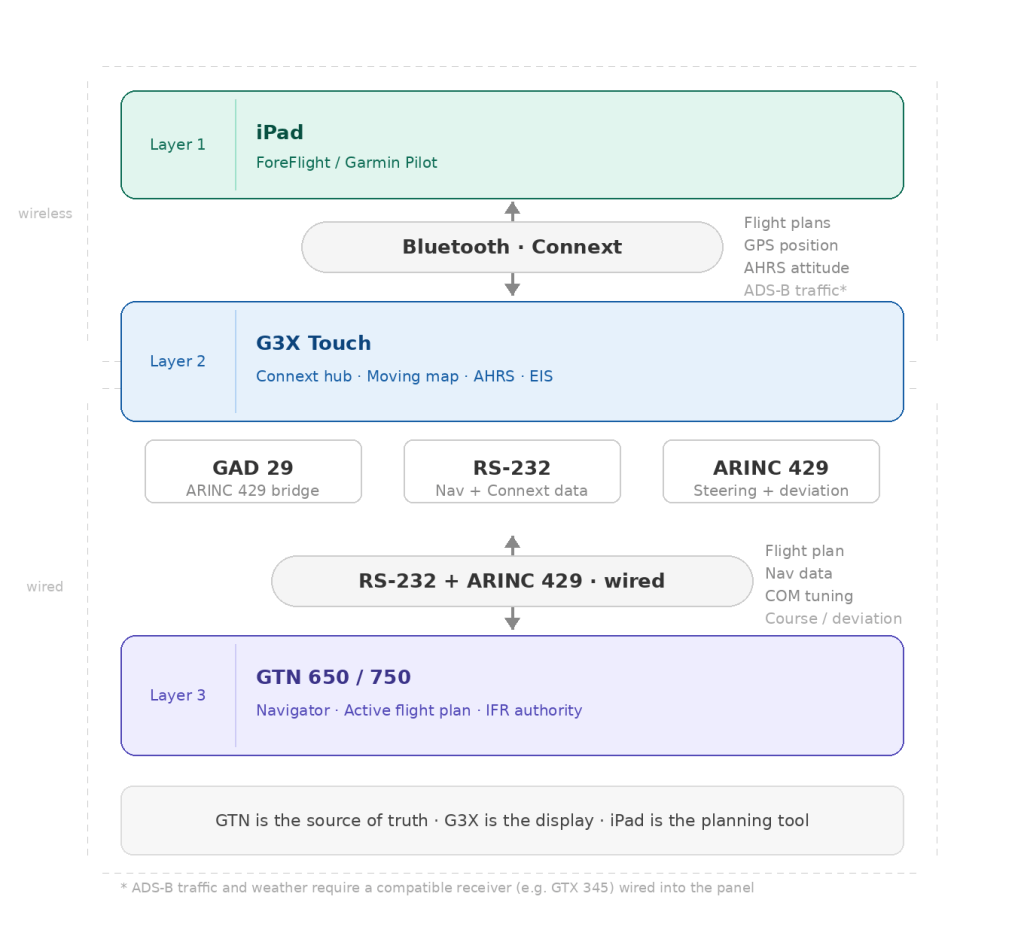
Layer 1 — The iPad (ForeFlight / Garmin Pilot)
This is where most pilots do their flight planning. The iPad sits at the top of the stack — it’s your preflight planning tool and your airborne reference. It doesn’t fly the airplane, but it needs to stay in sync with what’s loaded in the box.
Layer 2 — The G3X Touch: More Than Just a Display
This is the piece most pilots underestimate. The G3X Touch is not just a pretty moving map — it’s the wireless hub for your entire panel. Garmin’s brand name for this wireless ecosystem is Connext, and the G3X Touch has it built in natively via Bluetooth.
Connext is what allows your iPad to talk to your panel without any additional hardware. The G3X bridges the wireless world (your iPad) and the wired world (your GTN), acting as the relay between them.
Via the Connext Bluetooth connection, the G3X sends and receives:
- Flight plans — bidirectionally with the iPad and the GTN
- GPS position data — so ForeFlight always knows where you are
- AHRS attitude data — pitch and roll for ForeFlight’s backup attitude display
- ADS-B traffic and weather* — only when a compatible ADS-B receiver is installed and wired into the panel
Note
The G3X Touch Connext connection itself does not generate ADS-B data — it only passes it along. For ADS-B traffic and weather to reach your iPad via Connext, you need a compatible ADS-B receiver in the panel, such as a GTX 345 transponder or a GDL 45RR receiver, connected into the system.
Without one of these, the G3X Connext connection will still pass flight plans, GPS position, and AHRS attitude to your iPad — but not traffic or weather.
Layer 3 — The GTN 650/750: The Navigator and IFR Authority
The GTN is the bottom of the stack and the most important box in the panel for IFR operations. It holds the active flight plan, executes navigation, flies approaches, and talks to the autopilot. When it comes to the flight plan, the GTN is the authority.
The Wired Connection: RS-232 and ARINC 429
The G3X and GTN communicate over two wired data buses — RS-232 and ARINC 429. In most installations a Garmin GAD 29 interface module handles the ARINC 429 side of that connection and is what enables WAAS approach guidance, GPS steering, and other advanced features to flow between the two systems.
The connection carries navigation data, flight plan information, COM/NAV tuning, and more — and it works bidirectionally, so changes on the GTN automatically appear on the G3X.
What About the Flight Stream 210/510?
Garmin makes a device called the Flight Stream 210 (and 510) that adds Bluetooth connectivity to panels without a G3X. In a standalone GTN installation without a G3X, this is how you’d get wireless flight plan transfer to and from an iPad.
In a G3X/GTN installation, the Flight Stream is not needed and not typically installed — the G3X handles that role natively. You may see it referenced in forums and Garmin documentation, but don’t let it confuse the picture for your panel.
The GTN Is the Boss
This is the single most important concept in this entire post, so it’s worth stating plainly: in a G3X/GTN installation, the GTN is the master. The G3X runs in what Garmin calls External GPS mode, meaning it defers to the GTN for all navigation and flight plan data.
Important
The GTN is the source of truth. The G3X is the display.
In practice this means:
- Whatever flight plan is active in the GTN will automatically appear on the G3X moving map and flight plan pages — no action required.
- If the flight plan changes in the GTN (because you modified it), the G3X updates automatically.
- The G3X does not push its own internal flight plan to the GTN in External GPS mode. The relationship flows one way for navigation — GTN to G3X.
The G3X can display and reflect the GTN’s flight plan beautifully, but it isn’t in charge of it. Keep that mental model and everything else will make more sense.
Scenarios: Real Workflows in the Cockpit
Scenario 1: The Standard Workflow — Enter on the GTN, Fly with the G3X
This is the baseline workflow and the one to build everything else around. You taxi out, boot up the panel, and enter your flight plan directly on the GTN using its touchscreen. The moment you activate the flight plan on the GTN, it crossfills to the G3X automatically — your moving map shows the route, the flight plan page populates, and the magenta line appears.
From here, the GTN screen becomes your primary navigation reference — CDI, course deviation, approach mode — while the G3X gives you the big-picture situational awareness view with traffic, weather, and the moving map overlay. Each screen is doing what it does best.
This is the sweet spot of the G3X/GTN combination, and it just works.
Scenario 2: Pushing from the iPad (The Preflight Workflow)
Most pilots who use ForeFlight or Garmin Pilot do their flight planning on the iPad before they ever touch the avionics. Here’s how that route gets into the panel:
- Pair your iPad to the G3X Touch via Bluetooth. In Garmin Pilot, this shows up under Devices once connected.
- Build your route in EFB and send it to the panel. The G3X receives it wirelessly via Connext.
- The G3X forwards the flight plan to the GTN over the wired RS-232 connection. On the GTN, you’ll see a prompt notifying you that a new flight plan is available to import.
- On the GTN, review and activate the imported flight plan. The GTN will never activate a flight plan without pilot confirmation — that action always happens on the face of the navigator.
Once activated on the GTN, the flight plan crossfills back to the G3X and you’re in the standard workflow. Note that Garmin Pilot can send a complete IFR flight plan including SIDs, STARs, and approaches through the G3X to the GTN — you don’t need to add procedures manually after the transfer. Review what landed on the GTN before departure, but in most cases it will be complete and ready to activate.
Scenario 3: ATC Gives You a Reroute Enroute or a Procedure
You’re in cruise, and Center gives you a revised routing. You modify the flight plan on the GTN — amending waypoints, direct-to a new fix, or accepting a new routing via the GTN’s touchscreen. The G3X moving map updates automatically and immediately. Your iPad will prompt you to accept the updated flight plan as well.
When ATC assigns a procedure — a new arrival, an amended approach, or a departure — load and activate it directly on the GTN. While Garmin Pilot can be used to select and send a procedure, the GTN must always be the one to activate it. Once active, the G3X and Garmin Pilot update automatically.
No special action needed on the G3X. This is External GPS mode working as designed — the GTN is the authority, everything else follows.
Can I make the reroute change in Garmin Pilot instead of the GTN?
For the en route portion of a reroute — amended waypoints, a new direct routing, a revised fix sequence — yes. You can work out the new routing in Garmin Pilot and push it through the G3X to the GTN, rather than typing it into the GTN touchscreen while managing the airplane. For a complex reroute string, this can actually be the faster and safer workflow.
For procedures the answer is still yes but with an important caveat. Whether a flight plan originates from Garmin Pilot, the G3X, or anywhere else, arrivals, approaches, and departures must always be confirmed and activated directly on the GTN face. The GTN will not sequence a procedure correctly until you have reviewed and activated it on the box itself.
The practical workflow for an ATC reroute: amend the en route waypoints in Garmin Pilot and push to the panel, then touch the GTN to confirm the incoming plan, and load any new arrival or approach procedure directly on the GTN. Less typing on the GTN, but the GTN still gets the final say.
Scenario 4: Editing the Flight Plan from the G3X
You can edit a flight plan from the G3X side, but it requires a deliberate mode switch and should be treated as the exception rather than the rule. Here’s how it works:
- Switch to Internal GPS mode on the G3X (Normal Mode > System > Setup). The G3X is now managing its own flight plan independently of the GTN.
- Make your edits on the G3X flight plan page.
- Send the updated plan to the GTN by pressing Menu from the G3X flight plan page and selecting Send to GTN. The GTN will prompt you to review and activate.
- Switch back to External GPS mode so the GTN resumes as the navigation authority.
This workflow is useful in specific situations — particularly VFR flight where you’re using the G3X as the primary planning tool and just want the GTN to follow along. For IFR operations, most pilots find it cleaner to make all flight plan changes directly on the GTN and let everything else follow.
Best Practice Summary
If you take nothing else from this post, carry these habits into the cockpit:
- Treat the GTN as the single source of truth for the active flight plan. Enter it there, modify it there, and let everything else follow.
- Use Garmin Pilot for preflight route building, then push through the G3X to the GTN. It’s a fast, clean workflow — and a complete IFR route including en route waypoints and airways transfers reliably.
- Always confirm and activate procedures on the GTN directly. Whether your flight plan came from Garmin Pilot or anywhere else, arrivals, approaches, and departures must be reviewed and activated on the GTN face before it will sequence them correctly. Plan for this step on every IFR flight.
- For enroute reroutes, Garmin Pilot is your friend. Amend the en route portion in the app and push it to the GTN rather than typing into the touchscreen while managing the airplane — then confirm on the GTN and load any new procedure directly there.
- Use the G3X moving map and flight plan view for situational awareness, not flight plan management. That’s what it does best in this configuration.
- If something doesn’t look right on the G3X, look at the GTN first.
Once the mental model clicks — GTN is the navigator, G3X is the hub and display, iPad is the planning tool — the whole system starts to feel remarkably well integrated. It really is a capable cockpit. You just need to know who’s in charge.


Leave a comment